Showing posts with label oven. Show all posts

Thursday, August 22, 2013

Quick Breakfast Bread - courtesy of Aunt Sandy

So scrolling through Facebook yesterday I came upon a picture of beautiful bread.

Picture Courtesy of my Aunt Sandy
Isn't that bread gorgeous!? Studded full of dried fruit and looking absolutely delicious. I had to know.

So going through the post I discovered that my Aunt Sandy had made this bread, she calls it "Quick Breakfast Bread." In the words of my Aunt "Just made Quick Breakfast Bread - my own creation. This recipe is super easy to make and pretty healthy - no oil, low sugar, and full of healthy fruits and nuts! Took some last night to a gathering and it disappeared! Had to make another loaf this morning for our house."

After that description on top of the picture I had to make it. Of course I'm cheap so I didn't buy any nuts to put in it but I can tell you it would just make it taste even better I'm sure.

So I scanned the ingredients. Flour, check. Brown sugar, check. Baking powder, check. Salt, check. Ground cloves and cinnamon, check. Milk, check. Only thing I didn't have was the dried fruit and nuts.

So after working out and sending the handsome man off to work I headed to Walmart for the missing ingredient and to maybe hunt down a fruit and nut mix.

Upon entering Walmart in any town of any state you are bound to have an adventure. Honesty there really isn't a way not to in some way. You are at least entertained. It's comical to me.

Anyway, my adventure began soon after entering the doors. I had walked in wearing my sweaty workout clothes (they do fit and cover all parts necessary). As I walked in there was this little girl (about 7) who had stopped dead in her tracks as she had been leaving with her mother and her eyes popped out of her head and she started to bounce. She had spotted a friend at the Subway in the entry and was obviously excited. Her mother stated "Well don't have a heart attack" and I proceeded to head for the back of the food section. Then about 20 feet in I hear this LOUD belch come from between the two doors you walk through. I turned around momentarily and just kind of snickered to myself. After walking past the produce this young man looked and me and said "do you run track?"

I had to quickly think, well technically no but I ran track in 7th grade and then in June as well. Mind you this was internal talk to myself. I smiled and said yes, because I do run everyday. The man had this triumphant look on his face as he said "I knew it, I have a knack for these things." I just smiled and kept walking. It was 9 pm and I really wasn't in the mood to chat with someone as I was on a mission.

I found the dried fruits but couldn't find a delicious combo of fruits and nuts that would work in my bread that wouldn't cost me more than $3. (I'm a cheapskate - ask Mike).

So headed home and break out all the ingredients and begin to follow the directions:


It already looked magnificent. Though I changed a few things. I didn't add nuts and I used 1/2 flour and 1/2 oats. Up the fiber a bit since I was using unbleached white all purpose flour.

Then add milk.
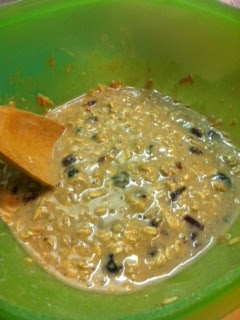

It smelled heavenly with the cloves and cinnamon, almost Thanksgiving like.

Now the fun part, deciding on a pan. For whatever reason I have not replaced the loaf pan I used to have and tossed due to wear and tear. So I found this pan hiding under all the casserole dishes.


Make due with what you have. So I do.

The recipe said to bake for 1 hour at 325 degrees F. Well, my electric oven runs a bit hot. Also, on another note, I can't stand electric ovens/stoves. I miss my old gas oven. So I only baked for 20 minutes to start. It wasn't done so I added another 10. It came out perfect at 30 min in a larger pan and my oven.

Anyway, I digress. This came out beautifully. Flat - but beautiful. I think I may have actually forgotten to add the baking powder. Oh well, still amazing.


So this is fresh and smelling wonderful. My kitchen now smells irresistible. I of course, cannot wait to dig in. 1. It's fresh, hot bread out of the oven. 2. Perfect timing to add butter or other toppings as desired. 3. This just looked AMAZING.

So I sliced up a sliver and taste tested.


I must say this is DELICIOUS! Perfection in a loaf. You could of course add any sort of dried fruits you want or any nut. My aunt recommends pecans or walnuts but get creative by all means. The fruits I used were a berry mix (cherries, blueberries and cranberries). I found this combination to be perfect. Though I can guarantee I will try apples, raisins, goji berries etc. Whatever strikes my fancy that time.

I will probably be making another loaf tonight just because I could literally eat this whole pan of bread by myself in one sitting. Hopefully Mike likes it too, he didn't get home until 8 this morning and am unsure if he had some for breakfast or not.

So thank you Aunt Sandy for the delicious recipe :) Keep them coming.

Quick Breakfast Bread
Courtesy of Aunt Sandy

Makes roughly 8 servings

Ingredients
2 cups flour (or 1 cup flour and 1 cup old fashioned oats)
1/2 cup brown sugar
2 1/2 tsp baking powder
3/4 tsp salt
1/4 tsp ground cloves
1/2 tsp ground cinnamon
1/2 cup dried fruit of choice (I used cherries, cranberries, and blueberries - get creative with your choices)
1/2 cup chopped nuts (I omitted because of cost - that's me)
1 cup milk (I used skim)

Directions
Preheat oven to 325 degrees F.

Grease a 9 1/2 inch loaf pan (or 8 inch square pan in my case) and set aside.

Mix all ingredients except milk.

Add milk and mix well.

Put batter into the prepared pan and bake for 1 hour. (I baked for 20 to start then had to add another 10 min to that to cook completely).

My aunt recommends toasting and serving with butter or cream cheese.

Also can mix up all the dry ingredients the night before and then just add milk in the morning and bake while you get ready in the morning. Warm breakfast bread fresh from the oven in no time. :)

Now go out and cook!

Thursday, July 19, 2012

Turning your kitchen into a sauna and mastering the art of a gas oven

Yeah that title will confuse you a bit. Turning your kitchen into a sauna is easy when you have a kitchen like mine. Galley style and one doorway to the rest of the apartment and in said doorway now hangs a curtain to keep the heat from my oven (gas) in the kitchen and not heating up the rest of my apartment. Since it is currently 100 degrees F here in the Midwest I would say keeping my apartment as cool as possible without cranking the AC and spending my hard earned money is a good thing.

So this week has been kind of blah and because I feel as such baking is a way to release that feeling. Let's see, Monday made brownies to use the chocolate coconut frosting I had made the week prior (sorry no pics). Then I made Tuesday, more pretzel bread by request of Mike so we could eat Brats inside the buns on Sunday for dinner/lunch - whatever. So I happily obliged in creating "brat buns" from the pretzel bread recipe. You can find the recipe here so you can make it too. Of course last time I made it into rolls rather than loaves, as the recipe suggests. This time I made buns. This is how things turned out

Activating the yeast in butter, water, milk and brown sugar

Dough fully mixed and ready for the oiled bowl
Dough ready to sit for 30 min
Risen dough after 30 min, time to knead for 5 min
Dough proofing/rising for another hour
Ready to degas
Degassing and ready to cut into pieces for buns
My attempt at bun shaped dough
Boiling water - ready for the baking soda. New pan is pretty huh :)
Boiled in baking soda boiling water
Dough boiled and cut tops. Ready for the 400 degree oven
Fresh from the oven
Beautiful are they not?
 Now note in the title - trying to master my gas oven. I have never used a gas oven until I moved to my current residence. I love the oven. Makes my heating bill cheaper in the winter. BUT regulating the temperature is another story.

Typically I seem to find that my baked goods keep coming out a bit over done on the bottoms. So I've had to adjust the time and make sure to pull goods out before they over brown. Mike told me to buy an oven thermometer so I could monitor it while baking. Glad I did. Didn't bother the brownies any, didn't bake as long as the recipe called for but having set the oven to 350 degrees the thermometer registered the oven at 350 degrees. However, going up to 400 my oven seems to think it's a blast furnace and cranks itself to 425/450!! HOLY CAT BALLS BATMAN!!! So I ended up baking for the first half of the time (10 min) and then reducing the last half to 8 min so as not to over cook my precious bread. It's soooooo delicious and the crust is just perfect and pretzely. The inside is fluffy and light. Mmmmmmm, yum. Can't wait to try them with bratwursts.

I only have one complaint about how my pretzel buns came out, they didn't puff as much as I would have liked them to, they stayed almost flat so they aren't as fluffy as a traditional bun, but part of that is due in part to the fact that I'm not making these with a loaf pan meant for things such as baguettes or french bread.

But these turned out beautifully - obviously.

So more to come later, I can't give everything away today in one post - well two since I did one this morning too. Banana bread and cookie dough stuffed Oreo's are on my brain. So you will see the results soon.


Friday, July 6, 2012

Köstliche Brezel Brot zu teilen - Anfrage von Mike (Pretzel Bread)

OK, pretzel bread. YUM! Granted you say pretzel and I'm in, must be the German side of me. Bread, pork, apples...yum. I'm definitely of German descent. I mean look at this family.


- yes there is an American flag back there, but this is my grandmother and her parents (great grand parents for me) Grandpa was from Germany - came over on the boat.


So I think my family has had a great influence on food for me as far as enjoying traditional German foods. OK, enough of the family history lesson here. I'm a proud German descendant lol I could go on forever. Mike has some German background but he is more of a European mix than anything. He looks like a good ole German boy though ;)

Anyway, so Mike actually suggested I make pretzel bread. He had some while visiting his folks last week and had it with a bratwurst. He said that if I could find a recipe I should try it, it was delicious (if you see the clam chowder post you can see the pretzel bread he had).

So I hunted down some recipes and compared what would be easiest and best. Of course I also choose to do this in the heat of the summer, where it has been in the low 100's lately. Topping 107 last I checked. We are breaking some records this year for hottest summer. Ick, so I tend to stay inside a bit more at the moment so not to have a heat stroke or burn to a crisp (that's another story).

So last night I had an easy workout going on and now that Mike has helped me keep my apartment cool by helping me hang black out curtains in my room and a sheer curtain in the doorway to my kitchen I now can bake and not have my air running CONSTANTLY - I have a gas oven/stove and so it's always a bit toasty in the kitchen to begin with. Just wait though -

So i pulled all the ingredients out and actually measured them prior to baking - that never happens. I then took my time making this, letting the milk come to room temperature, making sure the water was 120 degrees and getting flour sifted. (Again, I'm the simple type of baker who just bakes).

I let the yeast expand and start to bubble, added the salt and continued and created a lovely sticky bread dough.

Well, tacky - it rested on my counter for 30 minutes to rise (didn't have to put in a warm place because my kitchen was probably already 90 degrees).
After I had to pull it out of the bowl and knead it for about 2-5 minutes until smooth and "silky."


After it rested a second time I portioned it out into the balls you see on the left (5 to be precise).

Then I had to get the water bath ready. You have to boil water and add baking soda - which makes the water froth and foam like vinegar would with baking soda. Never knew that but was almost like a science experiment and was fun to watch the dough balls bounce around and dance in the water.


This method was used to help create a sort of tough outer layer to make the "pretzel" part of the bread. The crusty doughy outside of a soft pretzel. This is how that is achieved. Kind of like making bagels I would presume. My friend had come over and he was just fascinated with this as well. Mind you my kitchen is a sauna at this point with the stove going to boil water and now having to actually turn the oven on to preheat to 400 degrees!!!

My friend had, at one point, looked at me and said "I'm sweating my balls off but I'm curious and fascinated by this." I think it's funny that people think it's fun to watch me cook/bake. I just find it fun and stress relieving. Especially bread like this. I think I sweat off about 10 lbs last night. Phew!

So after I boiled each side of the dough for 30 seconds on each side I took it out of the bath and made sure the excess water came off and then placed each dough ball on a greased baking sheet.


This is where it gets exciting. Now is the time to bake. First I had to cut an X into the tops of each dough ball so that the bread would have a place to expand and not pop or I guess explode in the oven. I can't imagine it would "explode" but that is an interesting visual.

Now when they came out of the oven I was truly impressed with how they looked and promptly brushed with butter as the recipe suggested.

They are beautiful!


They came out golden brown with the chewy outer crust and the soft delicious inside. Doesn't taste like a soft pretzel really but oh my this was delicious. The recipe called for "bread flour" but I don't carry that in my kitchen let alone am I going to go buy some right now. So I just made sure to sift my AP flour. Don't these just look amazing!?


I packed one of up for work today and have the others for this weekend when Mike will be making sirloin steak and mushroom sauce - YUM!!! Oh he feeds me well. :) 


Add a little butter or some mustard - YUUMMMM


I could eat this bread all day.


A big thanks to Two Bites in Suburbia for the recipe.


Here it is:


Signature Pretzel Bread (makes 2 small loaves or 5 sandwich rolls)


2 1/4 tsp yeast (dry active is what I used)
1 cup water (110-120 degrees)
2 Tbsp room temperature milk (I used skim because that's what I have)
1 Tbsp dark brown sugar (I had light on hand)
3 Tbsp softened butter (blue bonnet margarine)
1 tsp kosher salt (I used plain old table salt)
2 1/2 - 3 cups bread flour (I used sifted AP flour)


4 quarts water
1/2 cup baking soda


Kosher salt to taste (table salt again)
2 Tbsp melted butter (in my case the butter was already pretty melted due to my new "Sauna kitchen")


Add yeast, water, milk, brown sugar and butter into a large bowl, whisking until all ingredients are combined. Let mixture rest for 10 minutes for yeast to activate. Mix in kosher salt. Start by adding two cups of the flour to the bowl, combining it with the other ingredients. Add more flour as it's needed, reserving just a bit for coating the dough mat later.


The dough should form a slightly tacky, but firm ball. Oil the bowl, place the dough ball in the bowl and cover with a damp towel for 30 minutes. After 30 minutes, knead the dough by hand or machine for at least 5-10 minutes until the dough is elastic and satiny (that's the word they used). Place dough back in bowl and recover for 1 hour.


Preheat oven to 400 degrees and bring the 4 quarts of water to a boil. When the water is boiling, slowly add the baking soda, (if you add it quickly and all at once, your boiling water will froth and boil over all onto your stove).

Remove the dough from the bowl and gently degas it.  Form two separate balls of dough, forming them into the shape you want.  Drop one of the smaller balls into the baking soda bath for no longer than 30 seconds, turning it once to guarantee both sides covered.  Drain the excess water from the dough and place it on an oiled baking sheet.  Repeat with second ball of dough.
Sprinkle the kosher salt over the bread to your specific tastes, and make sure to use a knife to cut a small incision on the top of the bread so the dough has somewhere to expand.
Cook the bread for 22 minutes, rotating the baking sheet once.
Once removed from the oven, immediately brush the melted butter over the loaves to guarantee a soft crust.
Now enjoy and try not to eat it all at one time ;)